In this article:
- ScriptCheck Opt Out (per patient)
- Processing scripts
- Clinically checked and Partially checked scripts
- Stock owed (Owings)
- Completed tab audit
When ScriptCheck has been switched on for your organisation, ProScript Connect is configured to dispense items via ScriptCheck by default.
ScriptCheck Opt Out (per patient)
A patient can be opted out of having their prescriptions processed using this ScriptCheck, or the pharmacy could consider the items or patient type not suitable to be dispensed by this method.
- From the PMR, select F1 – Patient Details.
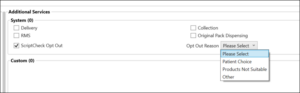
- Select the Services tab.
- In the Additional Services section, tick ScriptCheck Opt Out.
- Select an Opt Out Reason.
- Click F10 – Save.
Processing scripts
When adding prescriptions to the ScriptCheck queue, scripts are dispensed from the ETP module in the usual way. Follow the SOP for your pharmacy.
- From the ETP module, download the EPS scripts. Newly prescribed items are tagged as New Prescription.
Consider printing tokens in manageable batches, keeping the tokens for each batch together for completion of the labelling from the ScriptCheck queue. You can use the filters in ETP to view batches based around patient name, script type and more. You may want to disable the Auto Print Dispensing Tokens function from the ETP category of Edit Application Settings. You can print tokens individually, click F8 – Print on the View/Process Prescription screen. A batch of tokens can be printed from F10 – Batch Functions.
- Process the tokens in the usual way, processing EPS scripts.
- From the PMR and prior to endorsing the prescription, notice that the items ready for dispensing are marked by default as ScriptCheck.
- From the PMR, a token can be locally dispensed, if required, using Dispense Locally. You will need to dispense locally when:
- An owing is created
- An item requires the SSP additional endorsement to be added
- An item is an MDS item
- An item is a CD schedule: the acceptance of schedule 1, 2, 3, 4 and 5 is configurable in the app settings
- Endorse the script. Click F8 – Last Item.
ProScript Connect can be configured not to print the endorsement by default using the Endorse R2 Prescriptions configuration in the ETP category of Application Settings. - Click F10 – Save to complete the script.
By default, no drug or bag labels will be printed at this stage for ScriptCheck items. However, the following labels may print if configured to do so – alerts and drug warnings, NMS and DMS labels, Prescription Collection Point (PCP) and Pro Delivery Manager (PDM) barcodes. We recommend that these labels are kept with the patient’s dispensing token. If configured, Order basket confirmation and SMS/email notifications may also appear on screen.
Tip: For scripts that have both locally dispensed and ScriptCheck items, keep any locally dispensed items with its token to ensure all items are handed to the patient.
Clinically checked and Partially checked scripts
Items that have been marked as ScriptCheck are automatically added to the Queue tab of ScriptCheck Manager. From here, you can see which items have retained a clinical check from the previous 6 months with no changes – they have a Clinically Checked tag. These clinically checked scripts are ready to be used to generate a picking list (for either a single or multiple patient flow).
To indicate scripts that have some items that have retained a clinical check, and some item(s) that are either new or changed within the script, these are tagged as Partially Checked. A pharmacist only needs to clinically check those individual items and not the full script.
All ScriptCheck items must be clinically checked by a pharmacist before they can be processed through the scanning app. This can possibly be done away from the main area.
Filters
To assist in filtering out those scripts that require clinically checking, we have several filter options available. The pharmacist just needs to clinically check the items that are new on these scripts.
The clinical check can only be completed by a pharmacist. Access can be restricted using RBAC.
Stock owed (Owings)
Owings can’t be created for items in the ScriptCheck queue. Owings are only permitted for items dispensed locally. Therefore, the required item needs to be dispensed now for an owing, which removes the item from the ScriptCheck queue. In the following steps, the selected item is dispensed locally to create the owing.
Process an Owing
- Process the prescription as ScriptCheck. Before completion of the script, select F2 – Create Owing.
- The Create Owing message is displayed advising that an Owing cannot be created.
- To continue, click Cancel.
- On the PMR screen, click Dispense Locally, then click F2 – Create Owing.
- Complete the Edit Owing screen as required.
- To complete the prescription and create the Owing, click F8 – Last Item.
If an Owing has been created during the processing of a script using Dispense Locally, the item cannot then be marked as a ScriptCheck item prior to completing the prescription. The Send Item to ScriptCheck message is displayed. Click OK to continue processing locally.
Owings can also be created from Reprints.
Completed tab audit
On the ScriptCheck Manager screen, under the Completed tab, the items just dispensed are displayed with the Accuracy Checked details. Highlight a script to display dispensed quantity and which pharmacists(s) completed the clinical check on the items, in the lower pane.